Claude Desktop 集成
了解如何使用两种不同的方法将您的 1MCP 服务器与 Claude Desktop 集成:本地配置整合(为简单起见,建议使用)和远程自定义连接器(用于高级用例)。
集成方法
1. 本地配置整合(推荐)
最简单的方法是使用 1MCP 作为本地代理,将您现有的 MCP 服务器整合到 Claude Desktop 的配置中。此方法:
- 使用 stdio 传输(无需网络设置)
- 自动配置 Claude Desktop 以使用 1MCP
- 保留您现有的 MCP 服务器配置
- 完全离线工作,无需 HTTPS/隧道要求
2. 远程自定义连接器(高级)
对于高级场景,您可以使用 Claude Desktop 的自定义连接器功能并通过 HTTP 或 SSE 传输连接到远程 1MCP 服务器。此方法:
- 需要公共 HTTPS URL(隧道/反向代理)
- 支持 OAuth 身份验证
- 启用对集中式 1MCP 服务器的远程访问
- 适用于团队/企业部署
为什么将 1MCP 与 Claude Desktop 一起使用?
- 直接集成:无需本地设置即可远程连接
- 统一访问:通过一个端点访问多个 MCP 服务器
- 身份验证:内置 OAuth 2.1 支持安全连接
- 服务器管理:集中管理所有 MCP 工具
- 热重载:无需重新启动 Claude Desktop 即可添加/删除服务器
快速路径
选择你的方法
- 本地(推荐):无需网络;1MCP 通过 stdio 运行并自动接入 Claude Desktop
- 远程(高级):通过 HTTPS 暴露 1MCP 并添加自定义连接器
本地设置(推荐)
# 可选:先添加一些服务器
npx -y @1mcp/agent mcp add context7 -- npx -y @upstash/context7-mcp
npx -y @1mcp/agent mcp add sequential -- npx -y @modelcontextprotocol/server-sequential-thinking

# 将 Claude Desktop 整合为通过 stdio 使用 1MCP
npx -y @1mcp/agent app consolidate claude-desktop --dry-run  # 预览
npx -y @1mcp/agent app consolidate claude-desktop然后重启 Claude Desktop。会自动创建备份;可随时恢复:
npx -y @1mcp/agent app backups claude-desktop
npx -y @1mcp/agent app restore claude-desktop远程自定义连接器(高级)
- 启动服务器
npx -y @1mcp/agent serve --transport http --port 3001 --external-url https://your-domain.com  # 开发
npx -y @1mcp/agent serve --transport http --port 3001 --enable-auth --external-url https://your-domain.com # 生产服务路径:/mcp(Streamable HTTP)、/sse + /messages(SSE)、/oauth(OAuth)、/health(健康检查)。
- 通过 HTTPS 暴露服务器
- ngrok:
ngrok http 3001→ 使用https://<id>.ngrok-free.app/mcp - 反向代理:
- nginx:将
location /代理到http://localhost:3001(HTTP/1.1,关闭缓冲) - Caddy:
reverse_proxy localhost:3001 - Traefik:为主机创建路由 → 服务
1mcp(端口 3001)
- nginx:将
- 在 Claude Desktop 中添加连接器
- 名称:任意(例如“1mcp”)
- URL:你的公共
https://.../mcp - 可选:OAuth Client ID/Secret
注意:OAuth 2.1 会校验发行者(issuer)URL。务必将
--external-url设置为你的公共来源(例如https://your-domain.com或https://abc123.ngrok-free.app)。
- 必须使用 HTTPS
- 不要包含路径(不要带
/mcp)- 必须与 Claude Desktop 使用的来源完全一致
步骤 2:在 Claude Desktop 中添加自定义连接器
打开 Claude Desktop 设置
- 点击 Claude Desktop 中的个人资料/设置
- 前往“Connectors”或相关连接器管理处
添加自定义连接器
- 点击“Add custom connector”
- 你会看到类似如下的对话框:

输入连接详情
- Name:为连接器输入名称(例如“1mcp”)
- URL:输入公共 HTTPS URL:
- 使用 ngrok:
https://abc123.ngrok-free.app/mcp - 使用反向代理:
https://your-domain.com/mcp
- 使用 ngrok:
- OAuth Client ID(可选):若启用身份验证
- OAuth Client Secret(可选):若启用身份验证
确认信任
- 阅读安全警告
- 点击“Add”确认信任该连接器
步骤 3:验证连接
添加连接器后,你应能看到 1MCP 提供的工具:
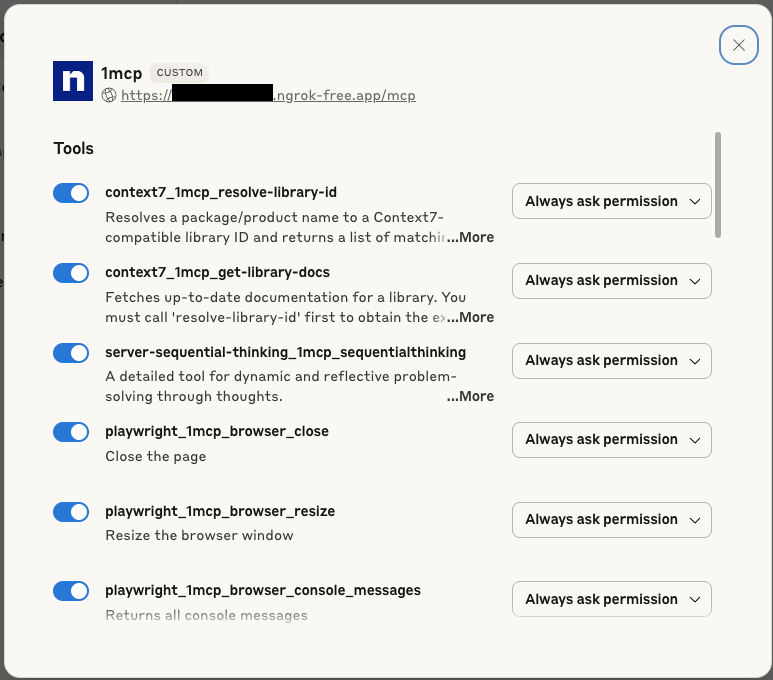
实际显示的工具取决于你的 1MCP 实例中已配置的 MCP 服务器,常见包括:
- Context7 文档工具
- 顺序思维工具
- Playwright 浏览器自动化
- 以及你添加的其他 MCP 服务器
步骤 4:开始使用工具
连接后,1MCP 工具会出现在 Claude Desktop 的聊天界面中:
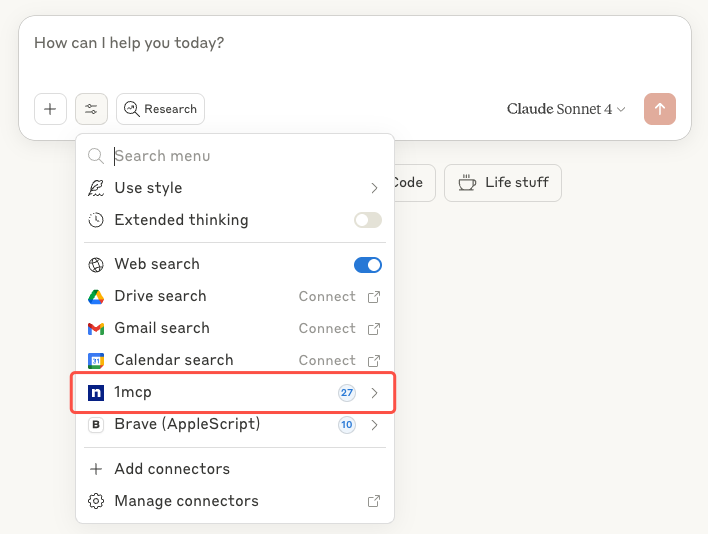
你现在可以在与 Claude 的对话中直接使用这些工具。
💡 提示:若某服务显示 “Awaiting OAuth”,访问服务器的 OAuth 面板
https://your-domain.com/oauth,点击授权后再在 Claude Desktop 重试。
服务器快速配置
# 启动
npx -y @1mcp/agent serve --transport http --port 3001 --external-url https://your-domain.com

# 启用身份验证(生产环境推荐)
npx -y @1mcp/agent serve --transport http --port 3001 --enable-auth --external-url https://your-domain.com

# 通过标签筛选暴露的服务器
npx -y @1mcp/agent serve --transport http --port 3001 --tags "context7,sequential" --external-url https://your-domain.com

# 绑定到所有网卡(置于反向代理后)
npx -y @1mcp/agent serve --transport http --port 3001 --host 0.0.0.0 --external-url https://your-domain.com身份验证
- 启用:
npx -y @1mcp/agent serve --transport http --port 3001 --enable-auth - 如需,在 Claude Desktop 中配置 Client ID/Secret;OAuth 流程自动处理
故障排除
本地配置问题
整合后工具未出现
症状:整合完成但 Claude Desktop 中未显示工具。
解决方案:
重启 Claude Desktop:整合后务必完全重启
检查配置:验证整合是否正确
bash# 检查生成的配置 cat "~/Library/Application Support/Claude/claude_desktop_config.json"测试 1MCP 服务器:确认 1MCP 正常工作
bash# 检查服务器状态 npx -y @1mcp/agent mcp status # 测试 stdio 传输 echo '{"jsonrpc": "2.0","id": 1,"method": "initialize","params": {"protocolVersion": "2025-06-18","capabilities": {},"clientInfo": {"name": "ExampleClient","title": "Example Client Display Name","version": "1.0.0"}}}' | npx -y @1mcp/agent serve --transport stdio
“整合失败”错误
症状:整合命令执行报错。
解决方案:
使用 --force:跳过连通性校验
bashnpx -y @1mcp/agent app consolidate claude-desktop --force检查权限:确认对 Claude Desktop 配置目录的写入权限
bashls -la "~/Library/Application Support/Claude/"手动清理:若整合只做了一半
bash# 从备份还原 npx -y @1mcp/agent app restore claude-desktop # 或强制重新整合 npx -y @1mcp/agent app consolidate claude-desktop --force
“配置备份失败”错误
症状:无法创建现有配置的备份。
解决方案:
检查磁盘空间
检查权限:验证备份目录写入权限
强制模式:在必要时无备份继续(谨慎)
bashnpx -y @1mcp/agent app consolidate claude-desktop --force --backup-only
远程自定义连接器问题
“无法连接”错误
症状:添加连接器时 Claude Desktop 显示连接失败。
解决方案:
检查服务器状态
bashnpx -y @1mcp/agent mcp status # 查看服务器是否已运行验证 URL:确保 URL 正确且可访问
bash# 健康检查端点在 /health curl https://your-domain.com/health检查防火墙:确保端口开放且可访问
工具未出现
症状:连接器可连接,但看不到任何工具。
解决方案:
检查服务器配置:验证 MCP 服务器配置是否正确
bashnpx -y @1mcp/agent mcp list重启双方:同时重启 1MCP 和 Claude Desktop
身份验证问题
症状:OAuth 身份验证失败或重复要求凭据。
解决方案:
- 检查 OAuth 配置:确认在 1MCP 中已启用 OAuth
- 发行者匹配:将
--external-url设为你的公共 HTTPS 源(无路径),并与 Claude 的连接器 URL 源完全一致 - 验证凭据:在 Claude Desktop 中确认 Client ID/Secret
- 清除缓存:移除并重新添加连接器
调试步骤
测试直连:
bash# 测试暴露的 HTTPS 端点 curl -X POST https://your-domain.com/mcp \ -H "Content-Type: application/json" \ -d '{"jsonrpc": "2.0","id": 1,"method": "initialize","params": {"protocolVersion": "2025-06-18","capabilities": {},"clientInfo": {"name": "ExampleClient","title": "Example Client Display Name","version": "1.0.0"}}}'查看服务器日志:
bashLOG_LEVEL=debug npx -y @1mcp/agent serve --transport http --port 3001健康检查:
bashcurl https://your-domain.com/health
安全注意事项
生产部署
- 通过反向代理提供 HTTPS(nginx/Caddy/Traefik)
- 生产环境启用 OAuth:
--enable-auth - 网络加固:防火墙、VPN/私网、在代理侧限速;被代理时绑定到 localhost
信任与权限
- 谨慎连接:仅连接受信任的 1MCP 服务器
- 理解权限:明确哪些工具会被暴露
- 定期审计:周期性检查已连接的连接器及其权限
高级用法
多个环境
你可以为不同环境添加多个 1MCP 连接器:
开发环境:
- 名称:“1MCP Dev”
- URL:
https://dev-abc123.ngrok-free.app/mcp(使用 ngrok)
生产环境:
- 名称:“1MCP Prod”
- URL:
https://prod-server.com/mcp - 配置生产 OAuth 凭据
服务器筛选
# 仅暴露特定能力
npx -y @1mcp/agent serve --transport http --port 3001 --tags "context7,sequential"最佳实践
本地
- 先发现 →
app discover - 先预览 →
--dry-run - 自动备份
- 整合后重启 Claude Desktop
- 保持 agent 更新;用
mcp status监控
远程
- 先从简单开始(无鉴权),再为生产增加 OAuth + HTTPS
- 健康检查与监控
- 定期复查权限;保持服务器更新
示例
本地(推荐)
# 1. 安装 1MCP 代理
npm install -g @1mcp/agent

# 2. 添加一些常用 MCP 服务器
npx -y @1mcp/agent mcp add context7 -- npx -y @upstash/context7-mcp
npx -y @1mcp/agent mcp add sequential -- npx -y @modelcontextprotocol/server-sequential-thinking
npx -y @1mcp/agent mcp add playwright -- npx -y @playwright/mcp

# 3. 预览整合
npx -y @1mcp/agent app consolidate claude-desktop --dry-run

# 4. 执行整合
npx -y @1mcp/agent app consolidate claude-desktop

# 5. 重启 Claude Desktop

# 6. 验证工具可用
npx -y @1mcp/agent mcp status整合后,Claude Desktop 将自动使用如下配置:
{
  "mcpServers": {
    "1mcp": {
      "command": "npx",
      "args": ["-y", "@1mcp/agent", "serve", "--transport", "stdio"]
    }
  }
}远程 + ngrok
适用于需要远程访问的开发场景:
# 1. 安装与配置 1MCP
npm install -g @1mcp/agent
npx -y @1mcp/agent mcp add context7 -- npx -y @upstash/context7-mcp
npx -y @1mcp/agent mcp add sequential -- npx -y @modelcontextprotocol/server-sequential-thinking

# 2. 通过 ngrok 暴露
ngrok http 3001

# 3. 启动服务器,使用 ngrok 提供的 URL
npx -y @1mcp/agent serve --transport http --port 3001 --external-url https://abc123.ngrok-free.app

# 4. 在 Claude Desktop 中添加连接器:
#    - Name: "My 1MCP Server"
#    - URL:  "https://abc123.ngrok-free.app/mcp"

# 5. 验证工具可用生产 + Nginx
# 1. 启动 1MCP 服务器(为安全起见建议绑定到 localhost)
npx -y @1mcp/agent serve --transport http --port 3001 --enable-auth --external-url https://your-domain.com

# 2. 配置 nginx 将 HTTPS 代理到本地 HTTP
# 3. 在 Claude Desktop 中添加连接器:
#    - Name: "Production 1MCP"
#    - URL:  "https://your-domain.com/mcp"
#    - 配置 OAuth 凭据

# 4. 验证工具可用获取帮助
遇到问题可参考:
- 查看上文的故障排除
- 针对本地整合问题:
- 试试
npx -y @1mcp/agent app consolidate claude-desktop --force - 使用
npx -y @1mcp/agent mcp status查看服务器健康 - 使用
npx -y @1mcp/agent app restore claude-desktop回滚
- 试试
- 针对远程连接器问题:
- 参考 Anthropic 文档:
- 在我们的 GitHub 仓库 提交 Issue
- 查阅 1MCP 文档 了解服务器配置
我应该使用哪种方法?
选择本地配置整合如果:
- ✅ 你想要最简单的设置
- ✅ 你在本机使用 Claude Desktop
- ✅ 你不需要远程访问
- ✅ 你希望离线可用
- ✅ 你不想处理 HTTPS/隧道
选择远程自定义连接器如果:
- ✅ 你拥有 Claude Pro/Max/Team/Enterprise 计划
- ✅ 你需要访问集中式 1MCP 服务器
- ✅ 你熟悉网络/HTTPS 配置
- ✅ 你希望在多个客户端之间共享 MCP 服务器
- ✅ 你需要 OAuth 身份验证